
Your Cyberdeck: Capstone Build
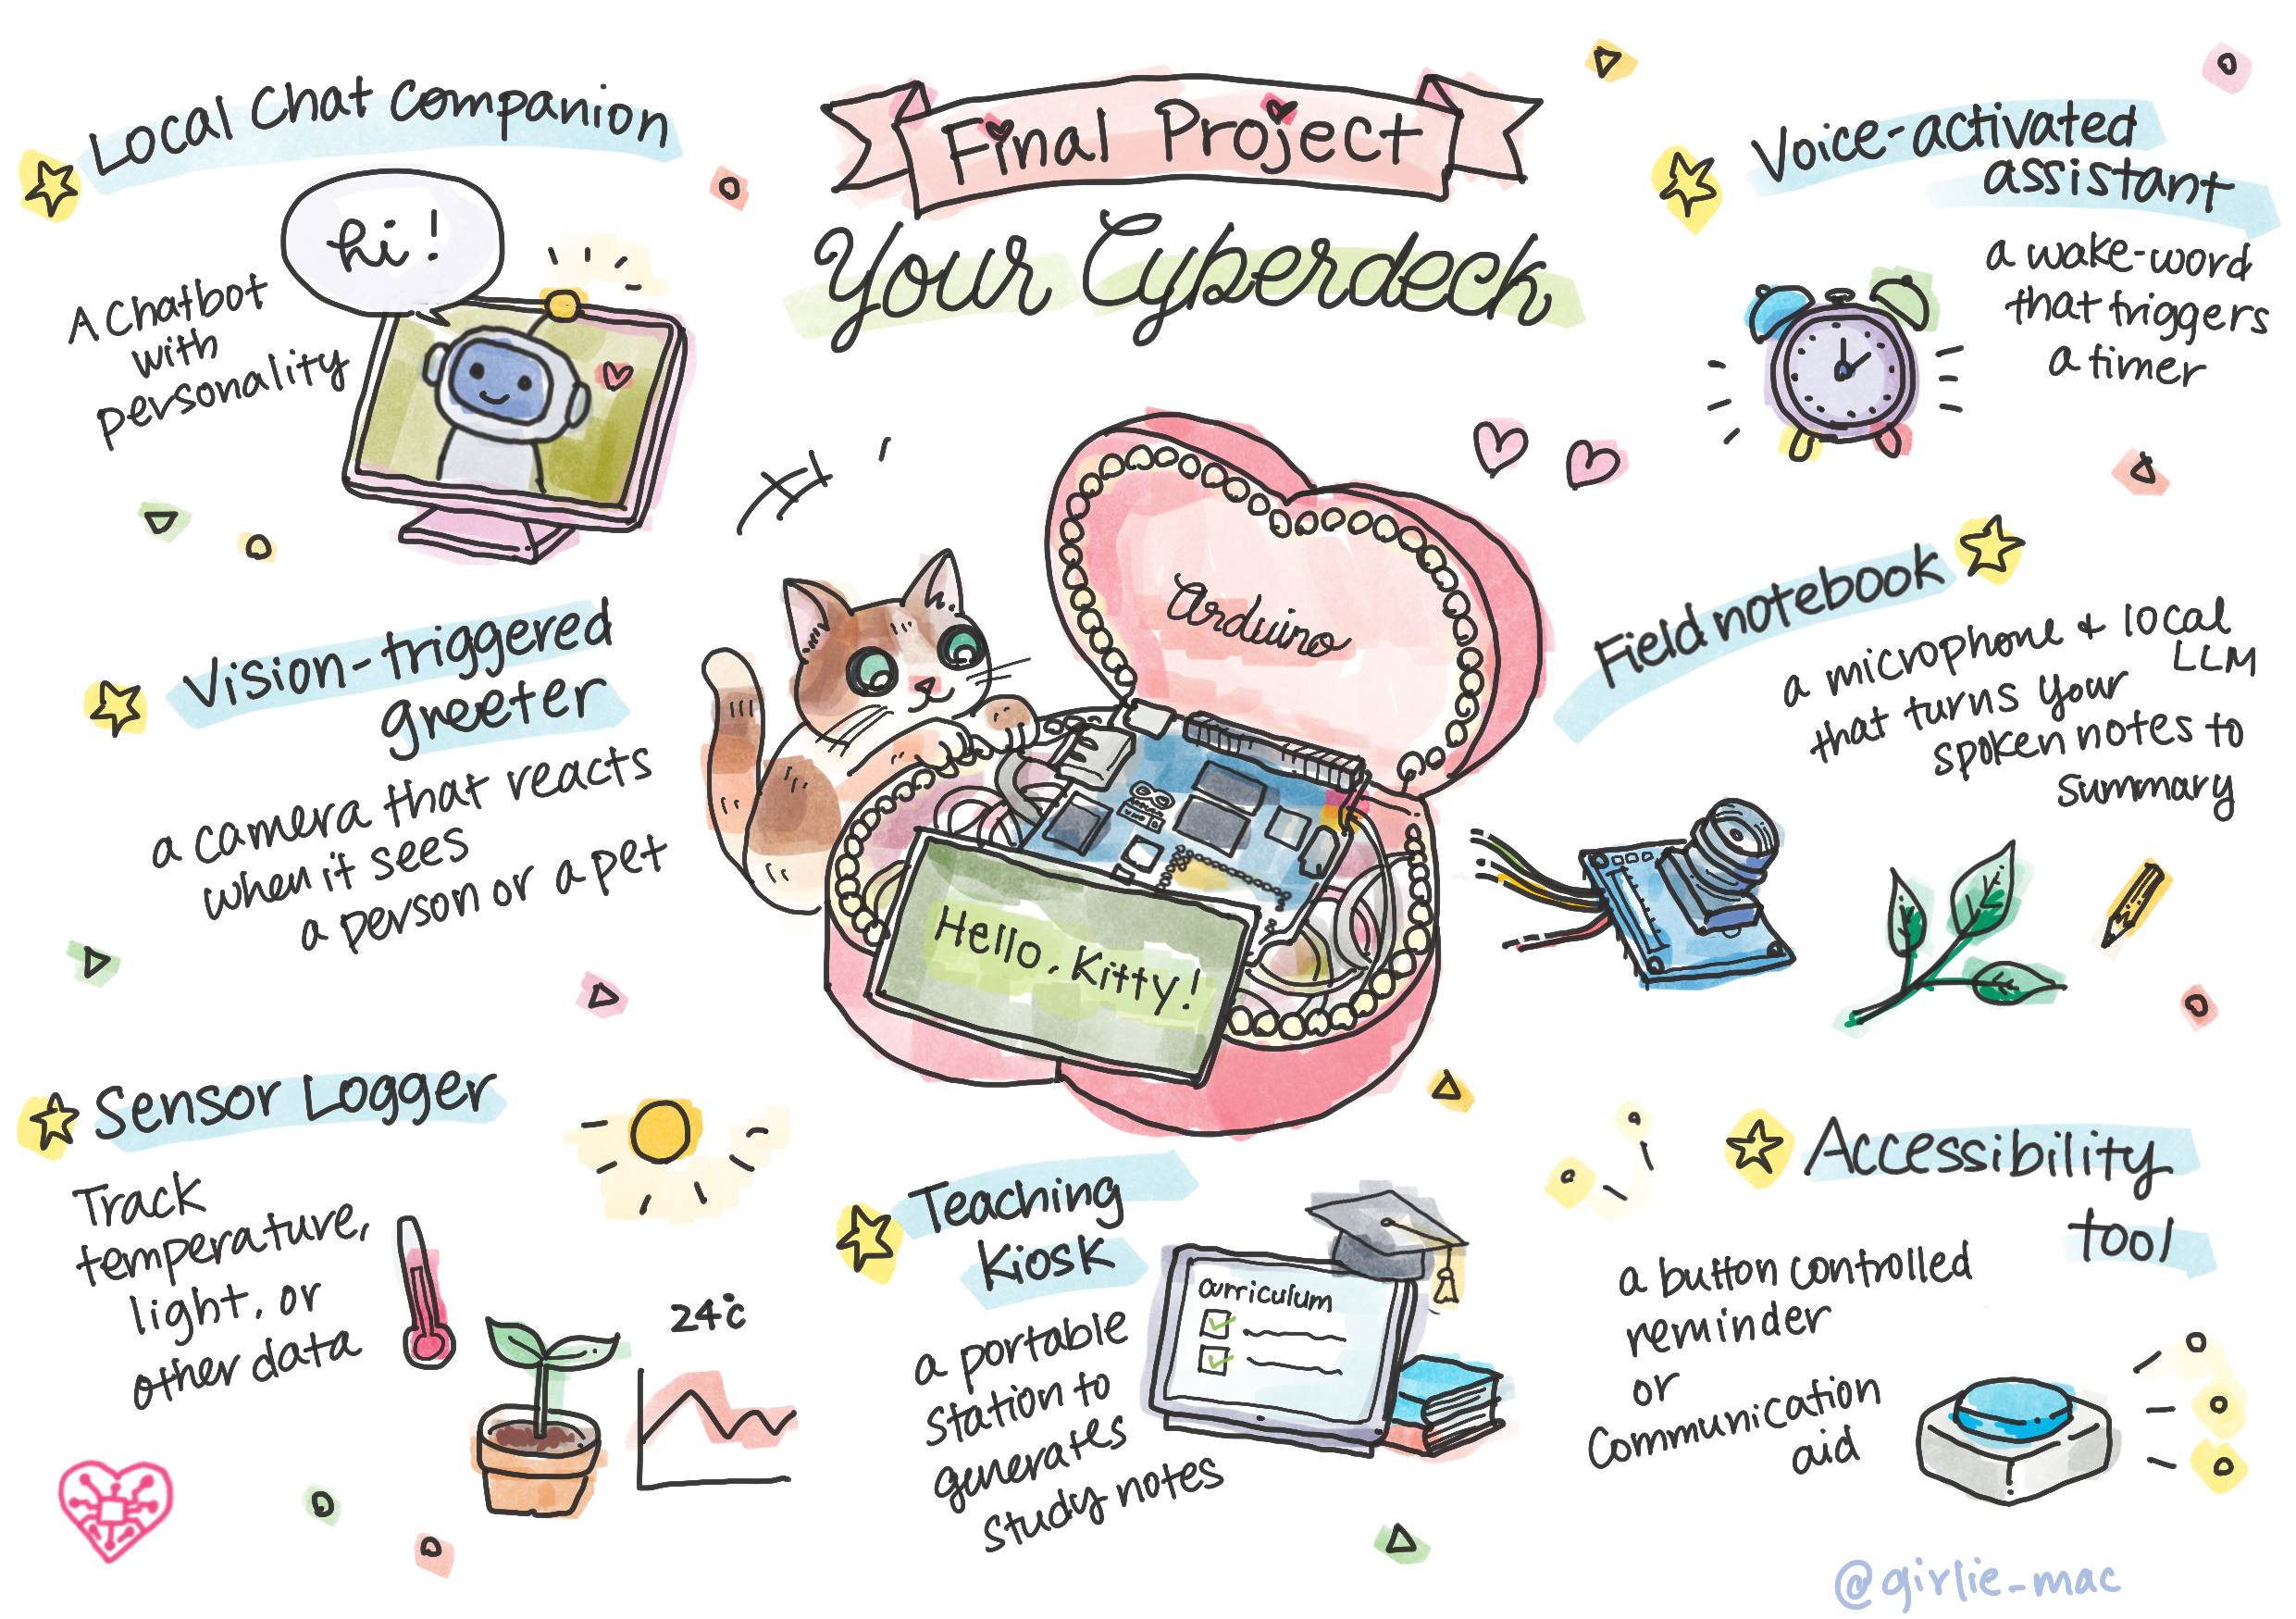
Capstone — an independent build. You choose the purpose, the peripherals, and the form factor.
| Lesson Goal | Design and build your own cyberdeck: a portable, personal computer built around a purpose you choose, combining the peripherals and skills from this course into one enclosure you design yourself. Finish with a working, battery-powered build you can carry and demo anywhere. |
|---|---|
| What you'll learn | By the end of this capstone you will be able to: - Scope an independent build around a use case you choose - Combine your AI Kit's peripherals (board, hub, monitor, keyboard, microphone, camera) into one portable system - Apply the engineering design process (sketch → plan → build → test → refine) to design and build your own enclosure - Power the whole build from a battery pack - Write a short credits/attribution page for the models, libraries, and data your build depends on - Present and teach your finished cyberdeck to someone else |
| Tools you'll need | Whichever parts of your AI Kit your build calls for — Arduino Uno Q, USB hub, mini monitor, HDMI and USB-C cables, Bluetooth keyboard, USB microphone, USB camera, a battery pack, enclosure materials (a project box, foam, cardboard, 3D-printed shell, or whatever you have handy), and your laptop with Arduino App Lab installed |
| End result | A custom cyberdeck, built around a project of your own choosing, running inside an enclosure you designed, ready to show off at a showcase night |
| Time needed to complete | About 180 minutes — plan for 2–3 build sessions rather than one sitting |
Session Plan
Your Her AI Studio kit requires no soldering and includes the following elements:
- An Arduino Uno Q board with 4G of storage, enough to run local AI models with a USB to USB C cable. Use that cable to connect to your power supply (wall or a hub)
- A USB Hub to plug in all your elements and connect to power. The hub has a built-in USB C hub that you use to connect to your Arduino board
- A USB camera
- A small USB microphone (may be already plugged into the USB Hub)
- A mini-keyboard to pair to your Arduino
- A mini monitor screen. Use a USB Mini to USB plug to connect the monitor to the hub, and use the short HDMI<>HDMI cable to connect the HDMI plug to the USB Hub.
You'll use App Lab, software that you download from Arduino, to run your either from your computer or the Arduino. This is where you build your apps to customize your cyberdeck.
You need to supply a way to power up your board. Most charging hubs work for this, or connect to your computer or to a wall outlet. You may need to experiment with some cables to see what works best.
The fun part about building a cyberdeck is how you customize it to your own personal needs and the enclosure you build. A purse can work although we recommend not going too small, to make sure everything fits. Good luck!
The next part of this session will cover some ways you can build your deck.
Part 1 — Choose Your Build (30 min)
Mini-lecture: What Is a Cyberdeck? (5 min)
A cyberdeck is a personal, portable computer that you build and configure yourself, rather than buy off a shelf. The term comes from cyberpunk fiction, but real makers have been building them for years — exposed boards, repurposed cases, keyboards bolted to whatever fits. What makes something a cyberdeck isn't any particular part list; it's that you decided what it does, what it looks like, and how it's put together.
This capstone is deliberately open-ended. Everything from here on is a starting point, not a script — adapt it to whatever you decide to build.
Activity: Pick a Use Case (10 min)
You don't have to build the same thing as the person next to you. Here are some starting points — pick one, combine two, or bring your own idea:
- Local chat companion — a chatbot with a personality you write yourself, running entirely offline, like a personal journal
- Voice-activated assistant — a wake word that triggers a timer, a trivia game, or a spoken reminder
- Vision-triggered greeter — a camera that reacts when it sees a person, a pet, or a specific object, perhaps to unlock a screen
- Field notebook — a microphone and a local language model that turns spoken notes into summaries, no internet required (here's an example)
- Sensor logger — a temperature or light sensor paired with an LED display that tracks readings over time and pairs it to moods or music or art picks
- Teaching kiosk — a portable station that listens to professors' lectures and generates notes and study guides
- Accessibility tool — a voice- or button-controlled reminder or communication aid
Activity: Pick a Build Option (5 min)
Your use case also suggests a form factor. Some options, roughly ordered from most portable to most capable:
| Build Option | Good for | Trade-off |
|---|---|---|
| Pocket deck | Carrying in a bag or purse, for quick demos | Smallest screen, least room to expand |
| Wearable or minimalist deck | A single sense (mic or LED only), lowest power draw | most limited interaction |
| Briefcase deck | A balance of portability and full capability | Bigger and heavier to carry |
| Field / ruggedized deck | Outdoor use, sensor logging, longer sessions | Needs a bigger battery and sturdier materials |
| Desktop deck | Showcase tables, demo stations | Least portable, but room for a full-size monitor and every peripheral |
Activity: Inventory and Sketch (10 min)
Before you touch glue, cardboard, or a drill, spend 10 minutes planning like an engineer would:
- Lay out the pieces your chosen use case and build option actually need — you may not need every peripheral in your kit.
- On paper, sketch where each piece will live in your enclosure. Ask yourself:
- What needs to be visible and reachable while it's running?
- What can be tucked away?
- Where do the cables need to travel, and how much slack do they need?
- How will you get at the battery to recharge it?
- Label your sketch with rough dimensions. You don't need exact measurements yet — just enough to know if your plan is physically possible.
💡 This is the first step of the engineering design process: sketch → plan → build → test → refine. You'll come back to this sketch in Part 3, and you can change it once you've actually tried fitting things together.
Part 2 — Add a Sense: Camera and Vision (Optional) (45 min)
Skip this part if your build doesn't call for a camera — not every project needs one.
Mini-lecture: Adding Sight to a Build (5 min)
If your use case benefits from reacting to what's in front of it, a vision brick is the way to add that. Just like a wake-word model, it runs entirely on the Uno Q's own Linux side — no image ever has to leave the board for your project to react to what it sees.
Activity: Connect the Camera (10 min)
- Plug your AI Kit's USB camera into the USB hub, alongside whatever other peripherals your build uses.
- Power everything on and confirm the board still boots normally. Adding a camera increases the load on your hub, so this is worth checking before you build anything else.
Troubleshooting: If the monitor goes blank or the board seems to freeze after adding the camera, check your hub's power source first — cameras draw more current than a keyboard or microphone, and an underpowered hub can brown out the whole chain.
- In App Lab, open your app and add a Vision brick the same way you've added other bricks earlier in the course.
Activity: Imagine the Reaction (20 min)
Before you wire anything up, decide what should actually happen when your build notices something. The detection event itself is the same no matter what you build — it's the reaction that makes it yours. A few starting points, matched to the use cases from Part 1:
| If your use case is... | A reaction to try |
|---|---|
| Local chat companion | Vision triggers a greeting through chat — "oh, hi!" |
| Voice-activated assistant | Vision confirms someone's actually there before it starts listening |
| Vision-triggered greeter | A light, sound, or message the instant it sees a person |
| Sensor logger | Log a timestamp every time something is detected |
| Generative art piece | Switch to a new animation pattern when it senses movement |
| Teaching kiosk | Display a fact about local AI when someone steps up to it |
Sketch your reaction the same way you sketched your enclosure in Part 1:
- Input: what, specifically, should the camera be looking for?
- Output: a light, a sound, a message on screen, a logged entry — what's the smallest, simplest version you could test today?
- Edge case: what should happen if nothing is detected for a while, or if it detects the wrong thing?
When you're ready to actually wire it up, App Lab's Vision brick documentation and its built-in examples walk you through connecting a detection event to whatever output you choose.
Try it: stand in front of the camera and see what the brick reports before you build anything on top of it — that raw detection is the foundation your reaction will sit on.
Activity: Make It Yours (5 min)
Pick one small extension and sketch how you'd add it:
- React differently to different detected classes, if your vision brick supports more than one
- Count detections over time and display or log the count
- Trigger a chat response or sound instead of (or alongside) a light
Part 3 — Power Up and Enclose: Making It Portable (60 min)
Mini-lecture: Why Portable Power Matters (5 min)
A cyberdeck that's still plugged into a wall isn't really portable — it's just a desktop computer you built yourself. A USB battery pack (power bank) is what turns your build into something you can actually carry to a showcase, a friend's house, or out into the field.
⚠️ Battery safety: USB battery packs use lithium-ion cells. Don't puncture, crush, or leave them charging unattended, and keep them away from heat. If a pack ever feels unusually hot, swollen, or smells odd, stop using it and tell your facilitator.
Activity: Test on Battery Power (10 min)
- Disconnect your USB hub from its wall-powered cable.
- Connect your AI Kit's USB battery pack to the hub instead.
- Power on the whole chain from the battery alone.
- Run through your build's core behaviors from end to end.
Troubleshooting: If something that worked on wall power stops working on battery power (often the monitor, since it draws the most current), your battery pack or hub may not supply enough current for everything at once. Try unplugging one peripheral at a time to find the bottleneck, and check your battery pack's rated output against your hub's requirements.
Activity: Build Your Enclosure (35 min)
Return to the sketch you made in Part 1. Now it's time to build it for real:
- Build: Using your planned materials (project box, cardboard, foam, 3D-printed shell, or whatever your studio provides), start fitting your components into place. Cut, drill, or mount only what you're confident about — leave anything uncertain for now.
- Test as you go: After each major step (mounting the board, routing a cable, cutting an opening for the camera), power the deck back on and confirm everything still works. It's much easier to fix a mistake now than after everything is sealed up.
- Refine: Almost nobody's enclosure matches their original sketch exactly. If something doesn't fit where you planned, or a cable is too short, adjust your plan — that's the design process working as intended, not a failure.
💡 Personalize it. Paint it, label it, add stickers, give it a name plate — this is your cyberdeck. The engineering matters, but so does it looking and feeling like something you made.
Part 4 — Full Integration, Credits, and Showcase Prep (45 min)
Activity: Full Integration Test (15 min)
Run through a checklist of your own build's core behaviors, using only the battery pack — no laptop, no wall outlet. A general starting checklist:
- ☐ Power on using only the battery pack
- ☐ The board boots and your app's interface (screen, LEDs, or sound) appears correctly
- ☐ Every input your build relies on works (keyboard, wake word, microphone, camera)
- ☐ Every reaction your build is supposed to produce actually fires
- ☐ All cables are secure and nothing is under strain when the enclosure is closed
Troubleshooting: If something worked before you closed up the enclosure but fails now, the most common culprit is a cable that got pinched or partially disconnected during assembly. Open it back up and check connections before assuming it's a software problem.
Mini-lecture: Why Credit Your Sources (5 min)
Your cyberdeck depends on work other people did: Arduino's libraries and App Lab bricks, any model you trained or downloaded, and any sounds, art, or code you borrowed or adapted. Crediting that work isn't a formality — it's the same practice expected of any engineer, researcher, or open-source contributor, and it's part of being trustworthy about how your system actually works.
Activity: Write Your Credits Page (10 min)
Write a short credits/attribution section — on paper, in a text file, or taped inside your enclosure's lid. Include:
- The AI models you used and where they came from
- Any Arduino libraries or App Lab bricks you relied on
- Any art, sounds, or code snippets you borrowed or adapted, and from whom
- Your own name and the date you finished the build
Activity: Prepare Your Demo (10 min)
You're going to teach someone else how your cyberdeck works. Prepare a short (2-minute) walkthrough that covers:
- What your cyberdeck does, and who it's for
- One thing you're proud of in how you built it
- One decision you'd explain differently if you were starting over
Practice it once with a partner before the real showcase.
Reflection: What You Built (5 min)
Think back across the whole course:
- Weeks 1–2: You learned what AI actually is, trained your own classifier, and understood what "local" really means
- Weeks 3–4: You practiced wiring a board, sensors, and AI bricks together — a body, rule-based logic, and genuine local AI
- Capstone: You chose your own purpose, cut it loose from the wall, and built it a home you designed yourself
Congratulations — you built a cyberdeck.
Optional Supplemental Reading
- Arduino App Lab Documentation
- r/cyberDeck community showcase — real builders' part lists and enclosure ideas
- A quick web search for "lithium battery safety basics" before you rely on any USB power bank day to day
You Made It
You started this course by asking who builds AI, who it's for, and why your perspective matters. You're finishing it having built, from scratch, a working, portable, offline-capable AI system of your own design — one you can explain, defend, and teach to someone else. That's not a small thing.
Keep building. Keep asking hard questions. And if you know someone who should be in this room next time, bring them.
- Back to Home
- CSTA Standards Mapping — for facilitators who want to see how this capstone maps to classroom standards