
Kiku Wakes Up: Giving Your Pet Eyes, Ears, and a Face
| Lesson Goal | Give Kiku real AI senses: a microphone that wakes it up with local AI and a wakeword, and a camera that teaches it to tell good food from junk food. |
|---|---|
| What you'll learn | By the end of this week you will be able to: - Connect a microphone and use a local wake-word model to wake Kiku up - Connect a camera and train a lightweight local classifier to recognize "good food" vs. "junk food" - Combine screen, microphone, and camera into Kiku's full multi-sensory pipeline - Explain the difference between Kiku's rule-based behavior (Week 3) and its AI-powered behavior (this week) |
| Tools you'll need | Arduino Uno Q board and Bluetooth keyboard (from Week 3), USB hub, the screen, USB microphone, and USB camera that ships with your AI kit, and your laptop with Arduino App Lab installed |
| End result | Kiku v2 — a pet on screen, ears that listen for its name, and eyes that can tell good food from junk food |
| Time needed to complete | 90 minutes |
Session Plan
Part 1 — Kiku's Full Capability (20 min)
Mini-lecture: Two Brains, One Pet (5 min)
Recall from Week 3: the Uno Q actually has two "brains" on one board — an STM32 microcontroller that runs your sketch (real-time, hardware-focused), and a Qualcomm processor running a full Linux environment, capable of running Python apps and graphics.
Last week, you built Kiku, your pet who lives on the mini monitor and with which you can interact with your mini keyboard. Its behavior is based on logic in code that you loaded onto your board.
Activity: Connect All Your Cyberdeck Peripherals (10 min)
This is the week you connect all the pieces of your cyberdeck.
If you don't have a Her AI Studio AI Kit, you can still do this activity using a small microphone and camera connected to your monitor. It won't be quite as fun but it will still work!
- Connect the USB hub to your Uno Q and to a power source, as you did in the last session.
- Connect the monitor to the hub.
- Make sure your Bluetooth keyboard (paired back in Week 3) is on and ready — you'll use it both to log in and to keep controlling Kiku.
- Power everything on. You should see the Arduino login/desktop appear on the monitor.
- Log in, then open App Lab from the screen (or from your laptop, connected to the same board).
Troubleshooting: If the monitor stays blank, check the hub's power connection first — a hub that isn't getting enough power often fails to pass video through to a display.
- Plug in the mini microphone to the hub
- Plug in the mini camera to the hub
Activity: Add AI Bricks (5 min)
In App Lab, add two AI bricks to your Kiku app: Video Image Classification and Keyword Spotting. We're going to use these to make Kiku "see" and "hear."
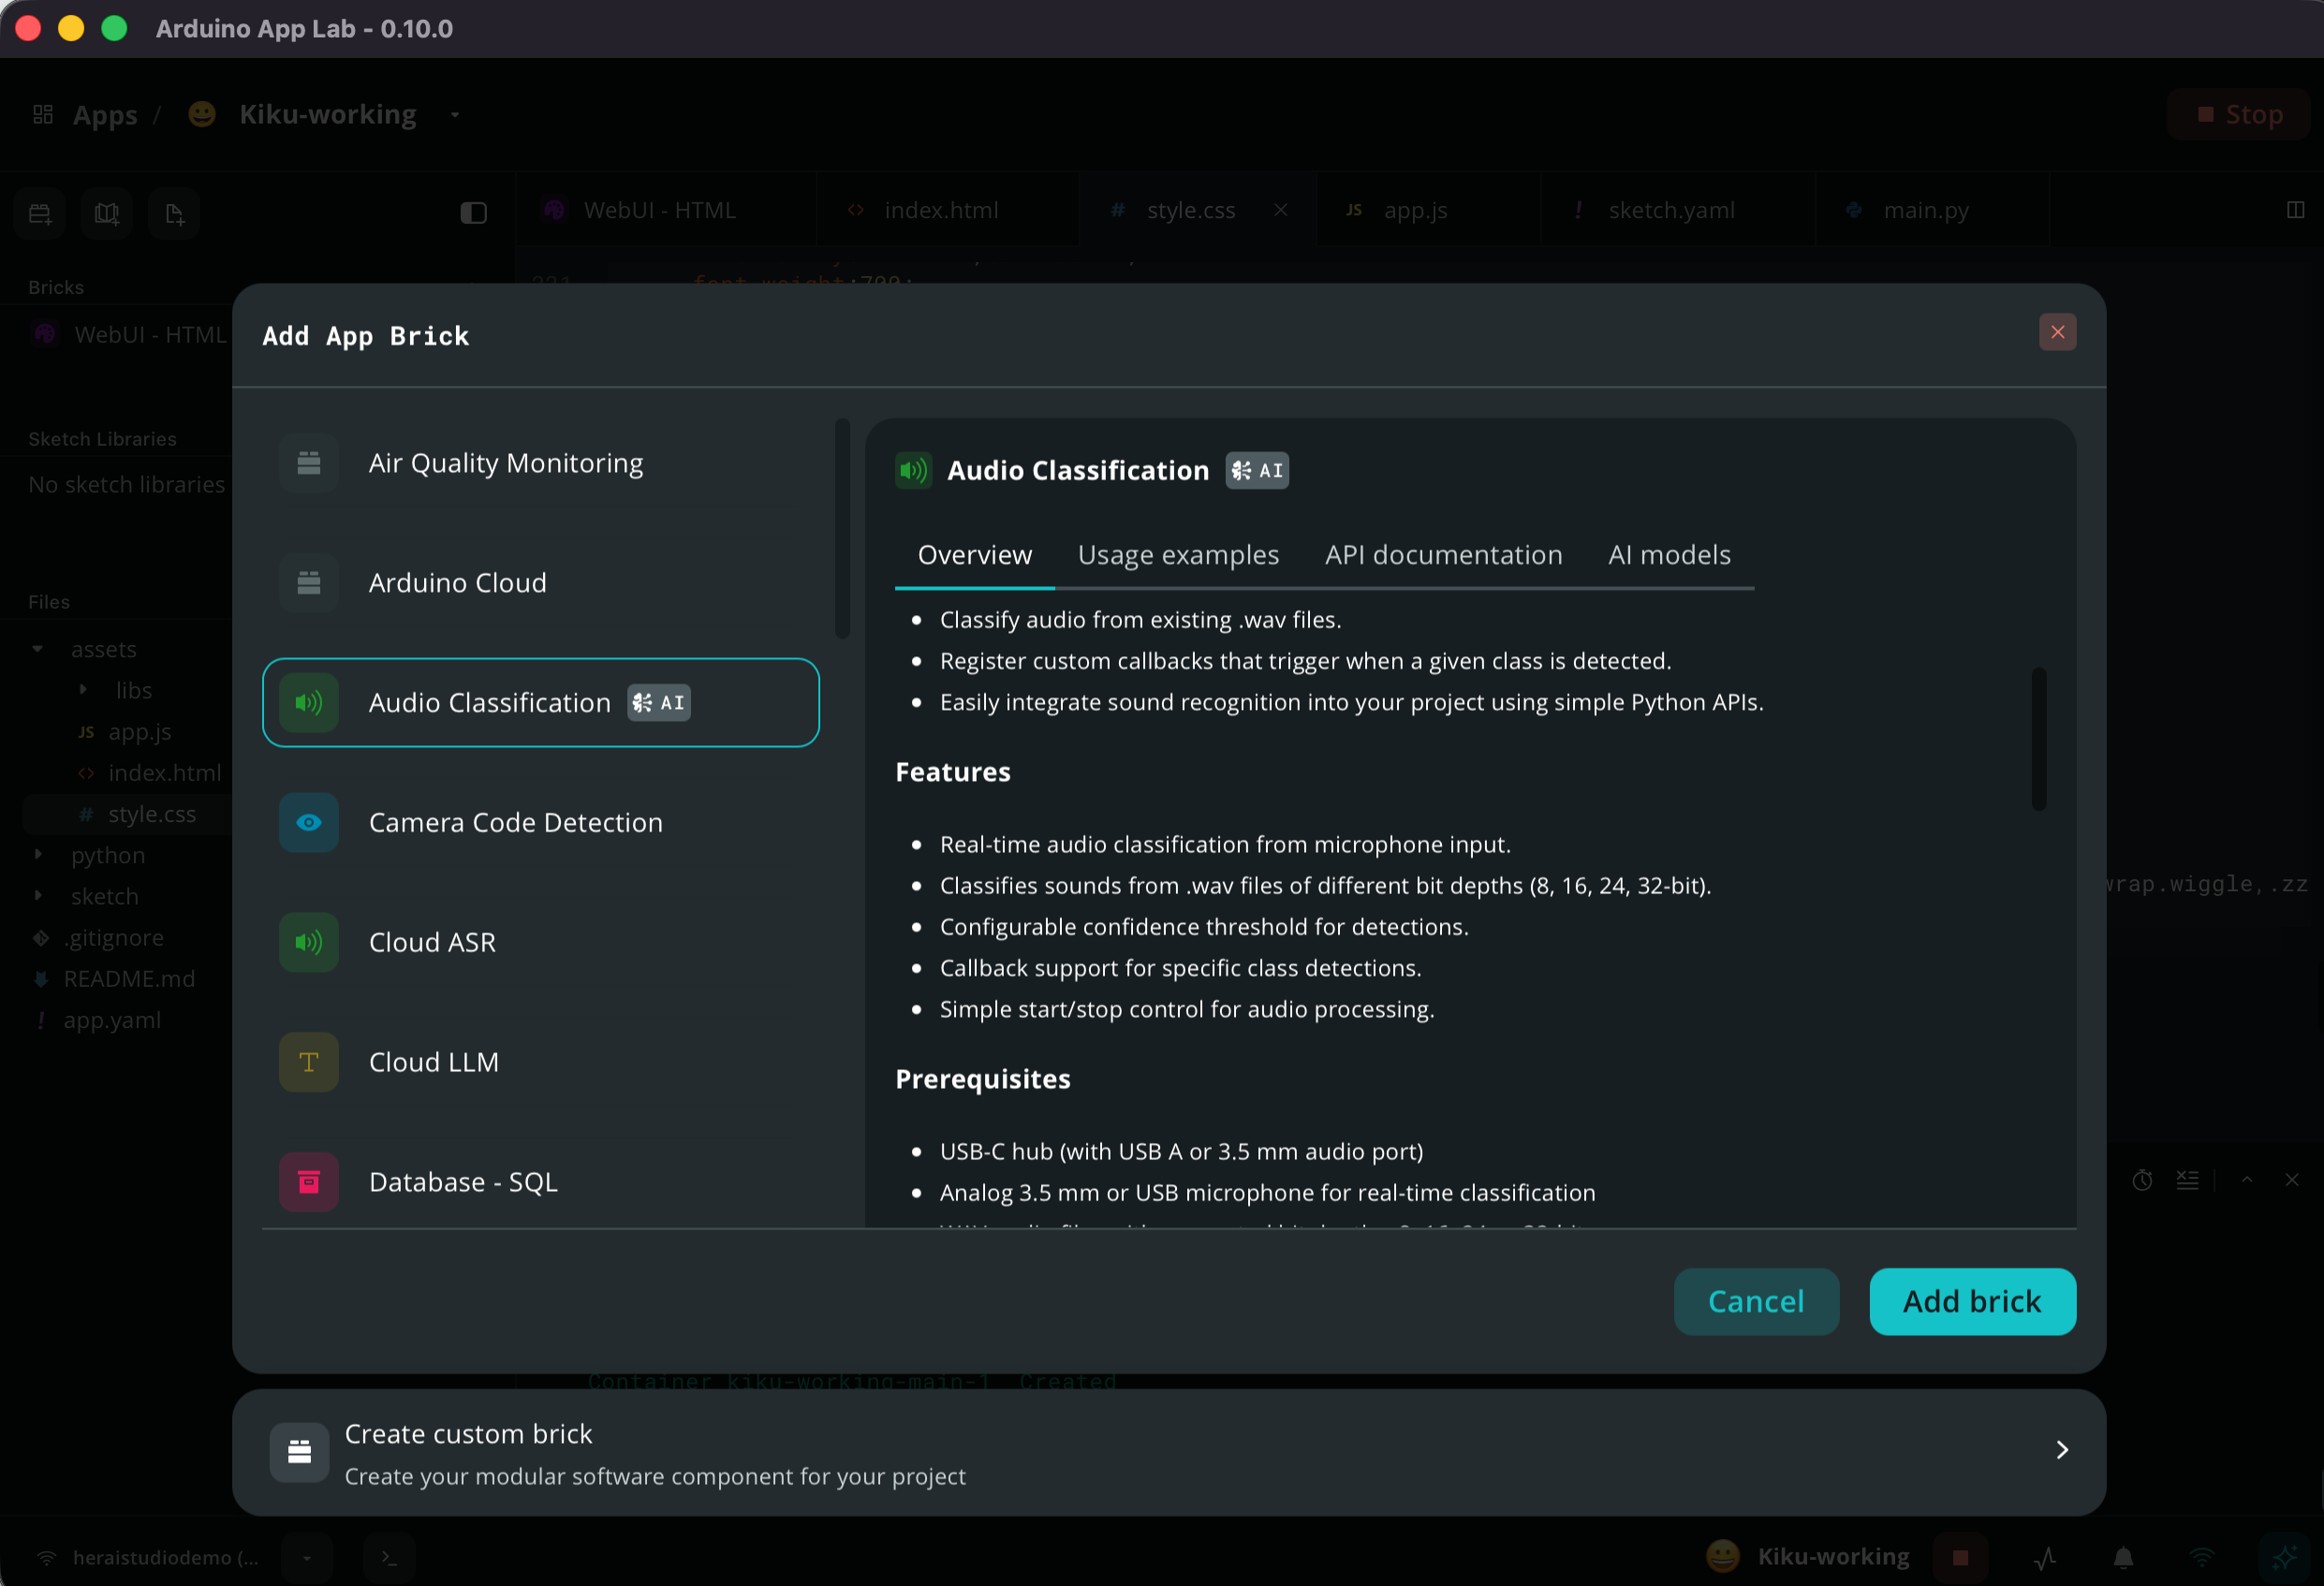
We'll wire each one up properly in the parts that follow — for now, just get both bricks added to the project.
Part 2 — Kiku Wakes Up: Microphone and Wake Word (25 min)
Mini-lecture: What's a Wake Word? (5 min)
Devices like "Hey Siri" or "OK Google" aren't listening to everything you say and sending it to a server — that would be slow, expensive, and a privacy nightmare. Instead, a small, efficient wake-word model runs constantly on the device itself, listening only for one specific phrase. Everything else gets ignored (and never recorded).
This connects directly to what you learned about data sovereignty in Week 2: because this wake-word detection runs entirely on the Uno Q's own Linux side, your voice never has to leave the device to figure out whether you said "Kiku."
Activity: Train and Deploy a Custom Wake Word Model (10 min)
The Keyword Spotting brick needs a model that knows what "Hey Kiku" sounds like. That model comes from Edge Impulse, a service affiliated with Arduino's App Lab. We've created a pre-trained model for you that can listen for "Kiku" or "Hey Kiku" — let's make it available to your device.
💡 You can use the free Developer plan in Edge Impulse Studio to train your own model on your own data, but for now let's save time by using this pretrained one.
- Create an account at https://studio.edgeimpulse.com and login
- Clone the model by opening its page: https://studio.edgeimpulse.com/public/1124727/live
- Click
Clone this projectin the top-right corner of the page. You can keep it personal and private if you like. - Once cloned, navigate to Deployment in the left sidebar of your cloned project.
- Select your target deployment option: Arduino Library. Make sure the Target at the top is Arduino Uno Q
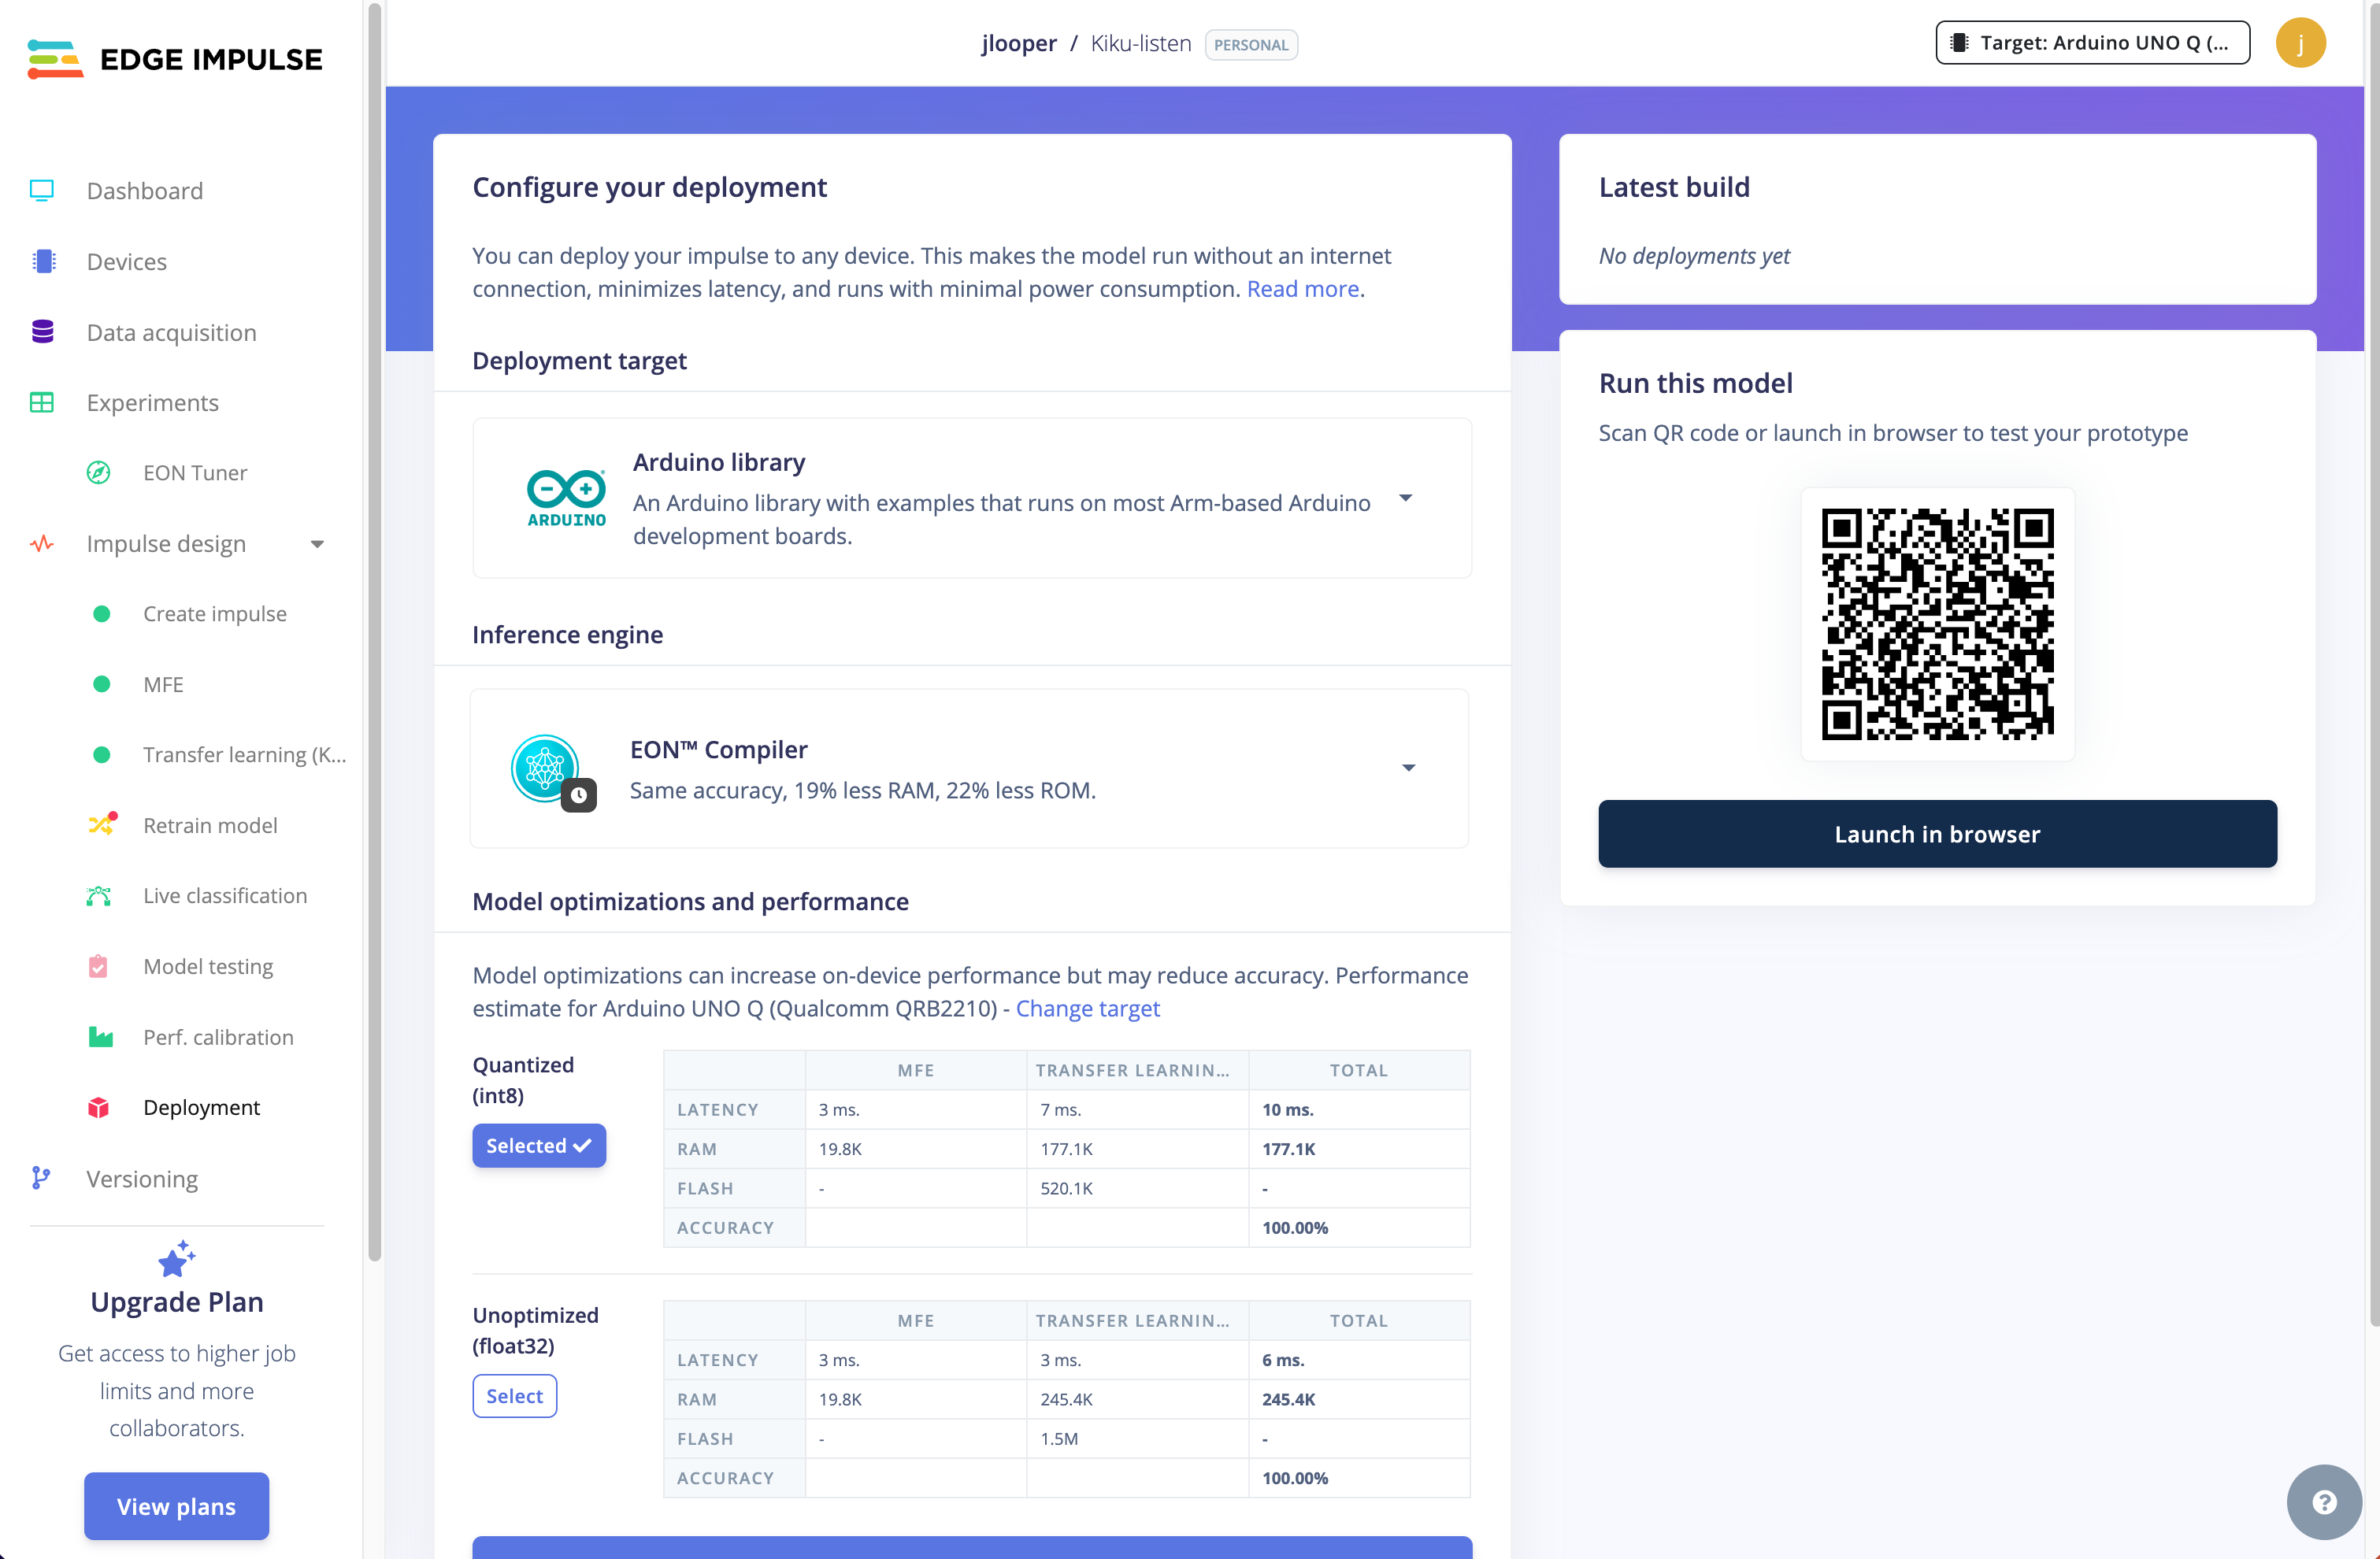
- Click Build
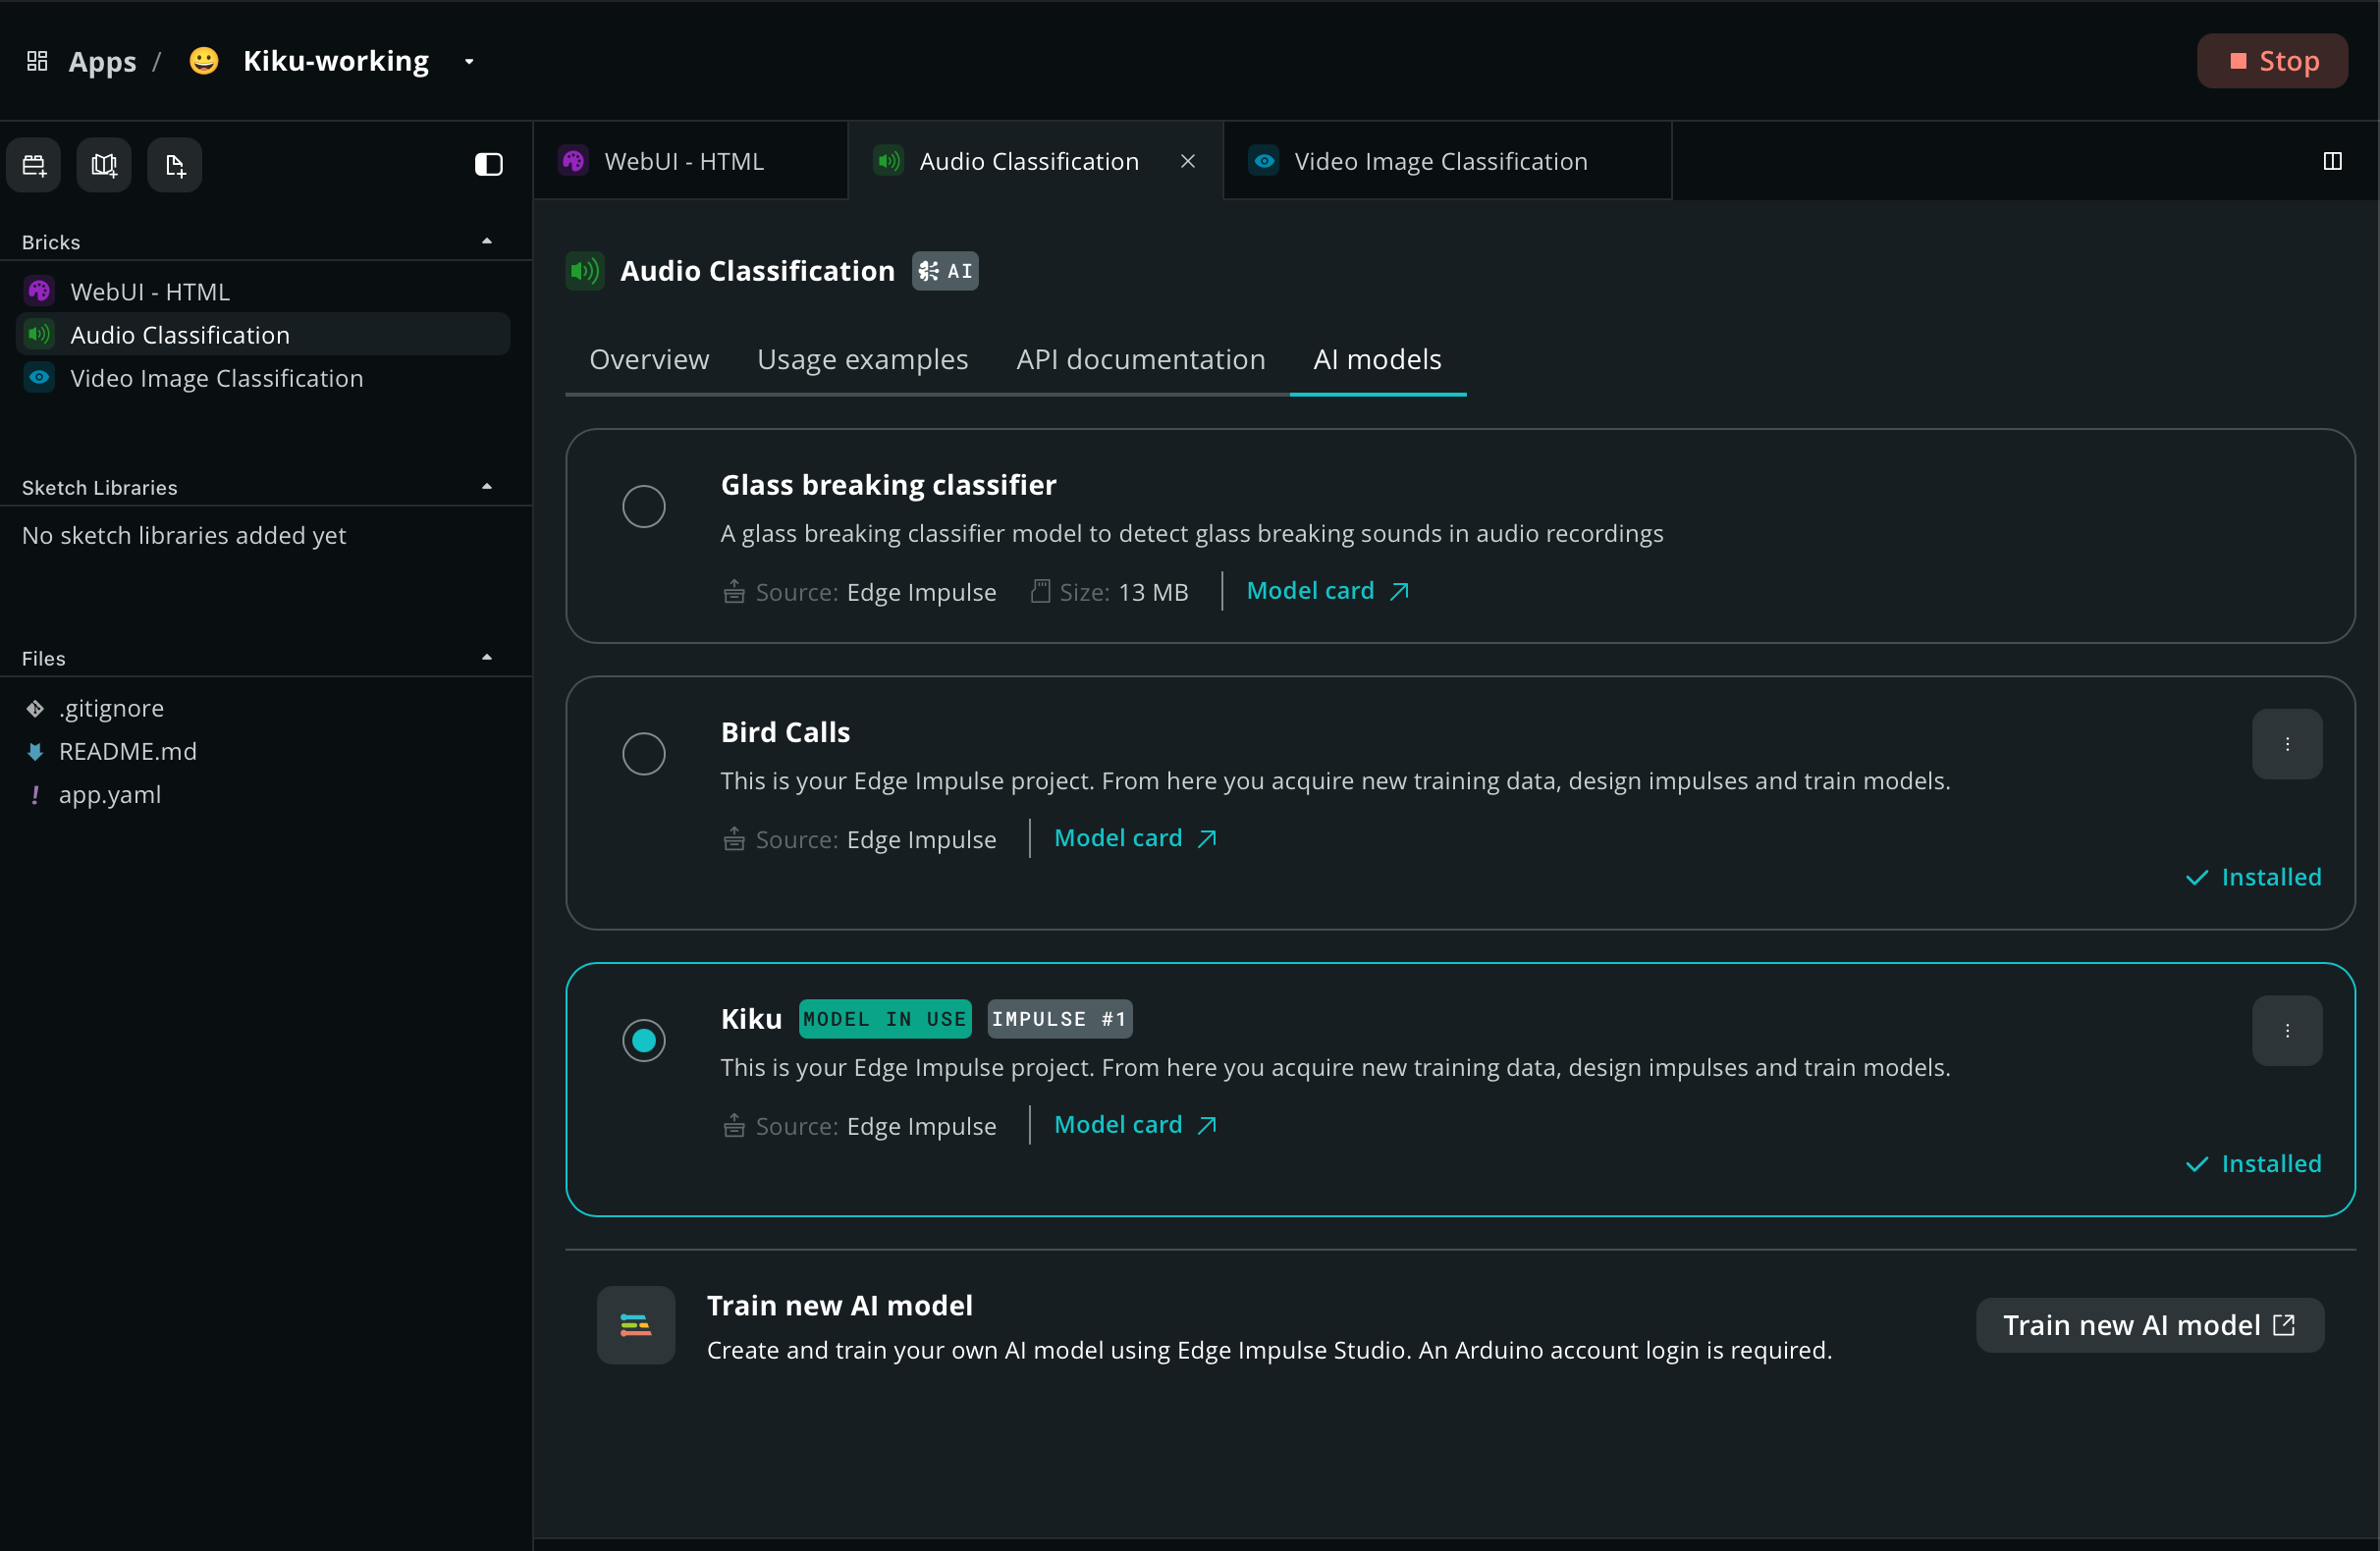
- Connect your device to your Edge account by returning to App Lab and clicking the AI models tab in your Kiku app's Keyword Spotting brick. Once logged in, App Lab is connected to Edge Impulse and you can find your models.
- Click
downloadand install the model to App Lab.
Activity: Wire Up the Wake Word (10 min)
Now let's make "Hey Kiku" actually do something. In the python folder, find main.py and add this code under the keypress function:
from arduino.app_utils import *
from arduino.app_bricks.keyword_spotting import KeywordSpotting

spotting = KeywordSpotting()

def on_wake_word():
    print("Hey Kiku detected!")
    ui.send_message("wake_up", {})

spotting.on_detect("Hey_Kiku", on_wake_word)

App.run()
In index.html, dig into the code and find function pet(). Under that, add another function to wake up Kiku:
function wakeUp(){
          if (!state.asleep) return;
          state.asleep = false;
          state.joy = 70;
          stopSnoring();
          petReaction(); burst('var(--happy)'); render();
          statusEl.textContent = 'hello there!';
        }

// Expose it so app.js (loaded after this script) can call it
window.wakeUp = wakeUp;
in app.js add this code to line 3:
ui.on_message('wake_up', () => {
  window.wakeUp();
});
Try it: put Kiku to sleep (from Week 3's sleep action), then say "Hey Kiku." Kiku should wake up.
Full-group debrief:
- How did it feel to "wake up" a device with your voice instead of a key press?
- Why does it matter that this all happens locally, without sending audio anywhere?
- What might go wrong with a wake-word model? (Think about accents, background noise, or similar-sounding words.)
Part 3 — Good Food, Junk Food: Teaching Kiku to See (25 min)
Mini-lecture: From My Room to Kiku (5 min)
In Week 2, you trained a custom image classifier in the My Room app using MobileNet, a small model designed to run on low-power devices. Today you'll do something very similar, except the classifier will run locally on the Uno Q itself, using its camera, and it'll only need to recognize two categories: good food and junk food.
Instead of retraining all of MobileNet (slow), we'll use it as a feature extractor — letting it do what it already knows how to do (recognize shapes and textures) — and train only a small, fast classifier on top, using just a handful of your own example photos. This is the same trick behind "teachable machine"-style tools.
Activity: Connect the Camera (5 min)
Plug your USB camera into the Uno Q. Confirm it's detected on the Linux side.
Activity: Train a Good-Food/Junk-Food Classifier (15 min)
pip install opencv-python tensorflow scikit-learnimport cv2
import numpy as np
from tensorflow.keras.applications.mobilenet_v2 import MobileNetV2, preprocess_input
from sklearn.neighbors import KNeighborsClassifier
# MobileNet as a feature extractor — we're not retraining the whole network,
# just reusing what it already knows about shapes and textures
feature_extractor = MobileNetV2(weights="imagenet", include_top=False, pooling="avg")
def get_features(frame):
img = cv2.resize(frame, (224, 224))
img = np.expand_dims(preprocess_input(img.astype(np.float32)), axis=0)
return feature_extractor.predict(img, verbose=0)[0]
camera = cv2.VideoCapture(0)
features, labels = [], []
for label in ["good_food", "junk_food"]:
input(f"Show the camera 5 examples of {label}, then press Enter...")
for i in range(5):
ok, frame = camera.read()
features.append(get_features(frame))
labels.append(label)
input(f" Captured {i + 1}/5 — reposition and press Enter for the next")
# A simple classifier trained on just those features
classifier = KNeighborsClassifier(n_neighbors=3)
classifier.fit(features, labels)
def classify_food():
ok, frame = camera.read()
prediction = classifier.predict([get_features(frame)])[0]
print(f"Kiku sees: {prediction}")
return predictionNote: Loading TensorFlow can take a moment. If class time is tight, ask your facilitator whether this can be pre-loaded before the session.
Now wire the result into Kiku: when classify_food() returns "good_food", update Kiku's state so it gets fed and happy; when it returns "junk_food", give Kiku a "sluggish" or "sick" reaction instead. Use the same Bridge approach from Part 1 to update the mood shown on the face.
Full-group debrief:
- How many examples did it take before the classifier reliably told good food from junk food?
- Try showing it something it's never seen. What does it predict, and why?
- What foods do you think it would misclassify, and why?
Part 4 — Kiku Comes Alive: Eyes, Ears, Screen, and Body (20 min)
Activity: End-to-End Demo (10 min)
Put it all together and try the full experience:
- Kiku starts out asleep (face shows "sleepy," eyes closed)
- Say the wake word — Kiku's face wakes up
- Hold up a food item to the camera — Kiku classifies it as good or junk food
- Kiku's mood updates on screen based on what it "ate"
- Use
PorSon the Bluetooth keyboard from Week 3 to play with Kiku or put it back to sleep
Reflection: What You Built
Think back across all four weeks:
- Week 1: You learned what AI is, and why your perspective on it matters
- Week 2: You trained a model on your own data and understood what "local" really means
- Week 3: You gave Kiku a body, a Bluetooth keyboard, and rule-based logic — no AI yet
- Week 4: You gave Kiku senses — a wake-word model and an image classifier — genuine AI, running entirely on your own hardware
Discussion prompt: "You just trained Kiku's food classifier on only a handful of examples — mostly foods from your own kitchen. What might it misclassify? How is this the same bias mechanism we discussed with big AI models in Week 1, just at a scale small enough to see directly?"
Take-Home
Check Your Understanding
- What's the difference between a wake-word model and full speech recognition?
- Why did we use MobileNet as a "feature extractor" instead of retraining it from scratch?
- What is the Bridge doing when it passes Kiku's mood from the sketch to the Python face app?
- Which parts of Kiku's Week 4 behavior are "real AI," and which parts are still the rule-based logic from Week 3?
- Why does it matter that the wake-word detection and food classification both happen locally, on the board itself?
Assignment
- Add more training examples to the food classifier and see if it gets more reliable
- Add a third food category (e.g., "not food") and see how the classifier handles it
- Design a new face expression for a mood not covered in class
- Write a short reflection: what would you need to add to make Kiku's food classifier trustworthy enough to actually rely on?
Optional Supplemental Reading
- openWakeWord on GitHub
- MobileNetV2 Paper — the architecture behind the vision model
- Transfer Learning with TensorFlow — the technique behind using MobileNet as a feature extractor
- Arduino App Lab Documentation